Create Ken Burns animations from Powerpoint
Narakeet can help you quickly create Ken Burns style animations from static images, panning and zooming across to make the visuals more appealing for viewers. This type of animation was made famous in the popular American history documentaries by Ken Burns, where static photographs and maps are animated to keep the viewer attention engaged during his narration.
- Quick demo
- Use a large presentation format
- Use large images
- Add slides and specify animations
- For static images, just cover the whole slide
- Add narration to your slides
- If there’s no narration, set the animation duration using a pause
- Make sure to select the right video format
- More information
Quick demo
The video below demonstrates how to use the ideas from this lesson.
It starts with an animated slide, leading into a static slide that acts as an introduction, then using slides 3-11 for an animated slideshow, followed by three static conclusion slides. This is a common pattern - you can show an introductory section, then animations, and then an outro/contact information.
Use a large presentation format
Start with a huge slide format, bigger than your target video frame.
To animate images with pan/zoom, you need to upload assets to Narakeet that are larger than the resulting video frame. Because you’ll be uploading a Powerpoint presentation, that means that the slides need to be larger than the video. (If the slides are the same size as the video, then the zooming effects will be jittery and pixelated.)
Unfortunately, Powerpoint insists on sizing slides with centimetres and inches, not with pixels, so it’s not easy to convert between the video sizes and the required slide sizes. Our video size tutorial has a helpful calculation matrix that shows you the right size for the slides. It also has helpful templates in the most popular formats, so you can get started easily.
If you’re making 720p videos, we recommend using one of the large Powerpoint templates (for example 1080p or even better 1440p).
Use large images
Make sure the source images are also big - stretching a small image over a large slide format won’t look nice. Your images should be at least the same size as the slides (so, for example, if you are using our 1400p template, the images should be at least 2560x1440 pixels).
Add slides and specify animations
Load the images as individual slides, then specify the animation properties in the speaker/presenter notes under each slide. You can set two properties:
- Size controls how the slide will be resized (just zooming, just panning, or combining zoom and pan)
- Position controls the direction of the panning/moving.
To set these properties for each animated slide, add image-size and image-position stage directions in the speaker/presenter notes under the slide. Narakeet uses these hints to animate the images.
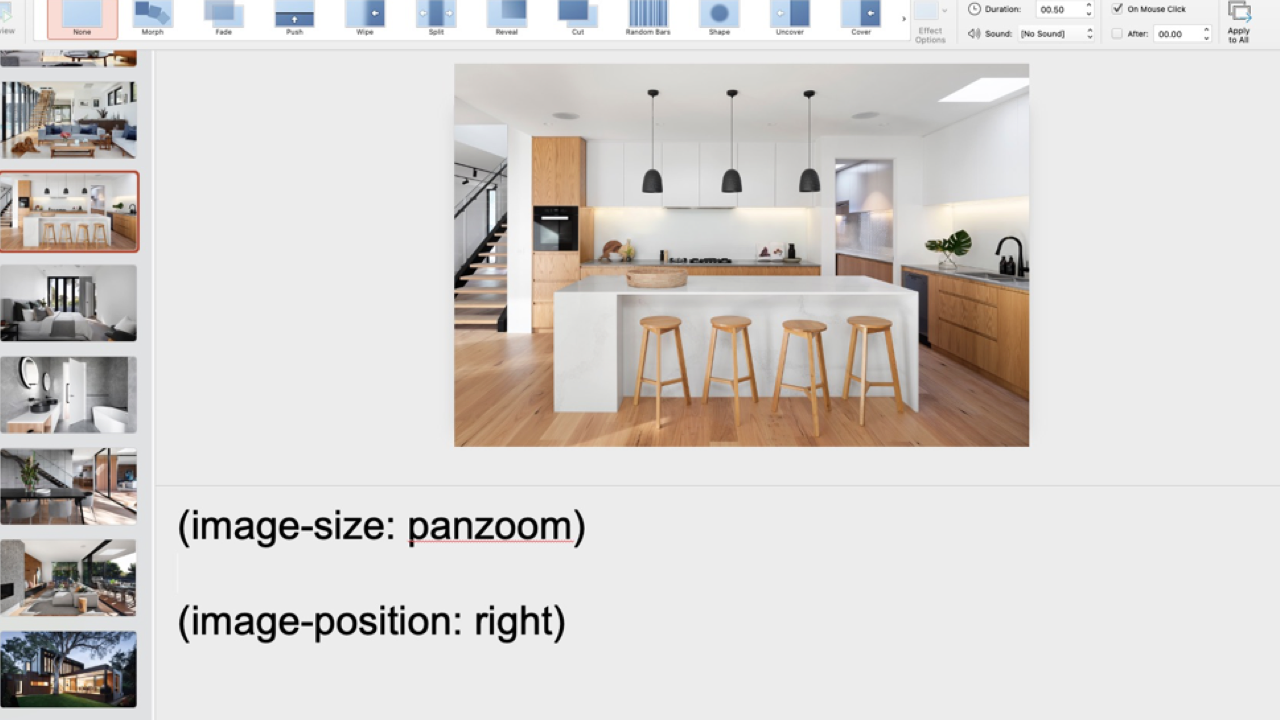
For example, to move the video frame across an image to the right while zooming in, put this into your speaker notes:
(image-size: panzoom)

(image-position: right)
When adding stage directions, make sure to specify them one per line, and to leave a blank line above/below each direction, so that they are separated by at least one line from the rest of the narration text.
You can choose from the following animations in the image-size stage direction:
zoom- start from the full image shown in the video frame, then zoom in graduallyzoomout- start zoomed in, then zoom out gradually to end with the full image in the framepan- start zoomed in, and move the image slightly over the video frame (specify the edge in theimage-positionproperty)panzoom- combine pan and zoom effects - move to one side while zooming inpanzoomout- combine pan and zoom out effects - move to one side while zooming out
To specify the direction of the panning (movement), use the image-position stage direction, and set it to one of the following four values:
topbottomleftright
If you leave out the image-position stage direction, it will apply the effects while keeping the image centered in the video frame.
For static images, just cover the whole slide
To get a static image, just cover the whole slide and do not put any size or position instructions. Narakeet will resize the slide to cover the whole video frame. In the demo presentation for this lesson, you can see this in action in the second slide and the final three slides.
The first and the second slide show an interesting trick. They use the same photo as the background, but the first slide is animated (with zoom-out) and ends up in the position where the picture covers the whole frame. The second slide is static, so it will cover the whole frame (it also has some letters over the background image). Combined, they look as if the animation is seamless from a zoom-out to showing letters, but it’s in fact two slides.
Add narration to your slides
Narakeet will automatically match the animation duration to the narration for each slide, or if you’re using a slide group with merged narration, to the whole block of slides.
In the example presentation for this tutorial, slides 3-11 are grouped into a single narration block.
Check out our tutorial on Creating a slideshow from Powerpoint for more information on grouping a bunch of slides to play during a single narration block.
When adding the narration text, make sure the stage directions are separated from the text by at least one blank line. For example, the following
(image-size: panzoom)

(image-position: right)

This is the text of the slide narration
If there’s no narration, set the animation duration using a pause
If you just want to use a static image with no narration, you can control the duration of the animation using the pause stage direction. For example, in the example presentation for this tutorial, the first slide is standalone - it animates a zoom out to join with the following slide that displays an intro slide.
(image-size: zoomout)

(pause: 1)
Make sure to select the right video format
After you upload the PowerPoint to Narakeet, make sure to build it using custom settings. This is important because by default Narakeet builds videos in the same size as the slides, and for panning and zooming we created a larger slide format. Click the Edit Settings button after upload, then select the appropriate size from the size dropdown.

More information
Check out the Creating a slideshow from Powerpoint for information on how to group slides for seamless narration.
To build pan/zoom animations using the Narakeet script interface, without Powerpoint, check out our tutorial on Animating slideshows with pan/zoom effects
For more information on image properties, check out the image asset format documentation.